Postman Crash Course for beginners

Postman is an API client for developing, sharing, testing the Api’s. You can easily integrate you API automation tests into CI/CD pipeline.
What you’ll learn in this course:
- What is a Request, Collection and how to create them
- What is Environment and how to Parameterize Requests
- How to add assertions
- How to run collections using Collection Runner
- How to run postman from CLI
- Integrate Postman tests with Github & Jenkins
What is a Request, Collections and how to create them.
You can send requests in Postman to connect with your APIs. You can send a request to create, read, update or delete the data.A collection however is noting but a collection for requests.
How to create and work with request:
GET REQUEST
- In your workspace, click on the NEW button on the top left corner and you’ll be prompted with a menu with multiple options. Click on the Request option.

2. Enter the request name and save. You’ll be redirected to your workspace.

3. Enter the below request url in the “Enter the URL” text box and select GET from the dropdown menu of the left side.
url: https://reqres.in/api/users
4. Click SEND.
5. You’ll see a 200 OK(For GET request, 200 is the success code) message and response.

POST REQUEST
1. Click on the “+” icon to open a new tab for new request.
2. Enter the URL and select POST method from the dropdown menu url: https://reqres.in/api/users
3. For the post request, everything will be same except that in POST request you have to send some Parameters. Parameters to send:
{
    "name": "morpheus",
    "job": "leader"
}
So, you can send params in a different ways depending upon the type of parameters you need to send: (i) In body tab, you can send params in a JSON format

(ii) You can click on Params and Enter the data in Keys and Values columns

OR You can use the Bulk Edit option on the right side if you prefer to enter your parameters in text instead of using the UI. In Bulk Edit, you can enter data in Key:Value pair

4. After adding parameters, Click Send.
5. You’ll see a 201 Created(For POST request, 201 Created is the success code) message and response.

COLLECTIONS
Colletions are nothing but group of multiple requests. Collections help you organize your tests and create a suite or workflow of your requests.
Creating collections:
You can create collections by :
- Clicking on NEW button on the top left corner and selecting Collection option.
- Enter Collection name and enter proper description about the collection.
- After submitting, collection will be available at the left pane.

- You can create a request in this collection by doing mouse hover over the collection > Click on 3 dots menu > Add Request
OR
You can just drag — drop any request from any other collection into this collection
- On mouse hover, you can click on the star icon to add this collection to favourites and this collection will be available on top.
- To RUN collection, mouse hover on the collection and click on the arrow button. A side window will open. Click on the RUN button to execute all the requests in the collection.

What is Environment and how to Parameterize Requests
An environment is a set of variables which we can use in our tests to manage common values for different tests.
Example:
You work with api’s on different environments in your organization such as Dev env, QA Env and Prod Env. For these api, only “base url” would differ depending on the environment you are working on and rest of the parameters could be same. So, instead of changing base url every time for different environments, We’ll create a variable and save the url in that variable.

Creating Variables(Parameterization):
We can parameterize our API tests or scripts by creating local, global, environment variables etc.
Local variables are temporary, and only accessible in your request scripts.
Global variables allow you to access data between collections, requests, test scripts, and environments.
Environment variables allow you to tailor your processing to different environments
To create a variable:
- Select the date from the address, parameters, headers, or body.
- Select Set as variable > Set as new variable
- Give some meaningful name to the variable and select the scope.
- Click on Set Variable.

- Variables can be used using the syntax {{Variable name}}.

- You can also create and edit global and environment variables using the Environment quick Look.

Similarly, you can create variables for different environments as well and saving their base url in values. So, you only have to select the environment from the dropdown.

Note: Keep the environment variable name same so that you don’t have to change the variable name in your tests every time you change the environment.
Example: In below images you can see I kept the environment variable name as “url” but changed the values so on switching b/w diff. environment, i don’t have to change the variable name in my script but my url value changes automatically according to the selected environment.


- You can create variables at diff. scopes and pass them in your tests, url, parameters, headers etc.
How to add assertions
At request level:
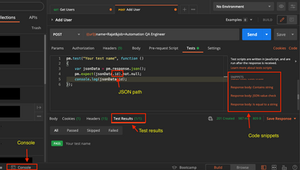
Assertions can be added against your requests in the Tests tab. They are also called Tests which are written in JavaScript.
You can write your JavaScript test manually or can use code snippets on the right side of the editor.
Note: If you want some script to execute before requests runs, you can use Pre-request Scripts tab.
- You can use pm.response object to carry out tests in order to validate the response.
- You can define tests using the pm.test function, providing a name and function that returns a boolean (true or false) value indicating whether the test passed or failed. You can use ChaiJS BDD syntax and pm.expect in your assertions to test the response detail.
- You can user console.log() to print values in console.
At collection level:
- Mouse hover on the collection > Click on (…) menu > Edit
- Under Tests tab, you an write tests which will be applicable for all the requests.

How to Run Collections using Collection Runner
Collection Runner allows you to run your requests or collections at a specified sequence.
- To RUN collection, mouse hover on the collection and click on the arrow button. A side window will open. Click on the RUN button to execute all the requests in the collection. This will open the Collection Runner window.
OR
You can click on the Runner option next to New.

- Postman will display your request and test results . To the right you will see a number for each iteration — click to select one. You will see an overview for each request, including its passed or failed tests — you can filter on each using the red and green buttons on the left.

How to run run postman from CLI
- To run postman collection using CLI, you’ll need to install NEWMAN postman add-on. To run Newman, make sure you have Node.js installed on your system.
To confirm if you’ve Node installed or not. Open CLI or CMD and enter
node -vIf you have it installed, then you are good to go.
- Enter this command in terminal to install Newman
npm install -g newmanOR
$ brew install newmanTo run a collection from CLI:
- Open collection menu from postman > Export > Choose recommended method > Save the file as .JSON in a separate folder in your system.

- Now open CLI and enter
newman run <Collection File>Note: Above command won’t work if you have set any variables in your script.
- To run your tests with variables, we’ve to export variables as well.
Go to Env Variable tab > Edit > Export > Save them in the same directory and folder as Collection.json file.

- Now open CLI and use cd command to switch to the directory where you have stored your files.
cd <Directory or folder name>Now enter following command
newman run <Collection.json file name> -e <Environment variable file name>
Results:

Integrate Postman tests with Github & Jenkins
Pre-requisites:
- Jenkins and Newman should be installed and setup on the system.
- Push both Postman Collection and Env variable files to your repo.
To run your postman tests from Jenkins:
- Go to Manage Jenkins > Plugin Manager > Install NodeJS plugin.
- Restart Jenkins > Manage Jenkins > Global Tool Configuration > NodeJS

- Go to Jenkins dashboard > New Item > Freestyle Project

- Scroll to Source code management > Add repository url, Branch name and credentials.
- Scroll to Build Environment and check Provide Node & npm bin/ folder to PATH(Keep settings default)
- Scroll down to Build > Execute shell(For Mac/Linux) or Windows windows batch command(For Windows)

Enter following command:
newman run <Collection.json file form git> -e <Env variable.json file form git>
- Click Save
- Click Build Now
- Click on the Build below > Console Output

Output:

Cheers!!
To read some more awesome blog visit https://www.automationinja.com/blog